Welcome to Our Native America Study!
The Books:
Note: I was able to find most of these books in our local library, but some are so beautiful that they make wonderful additions to your home library. Not every book is necessary for this study, but we read all of them, one at a time, during our morning story times. Stories are a wonderful way to become familiar with a culture.
Just in case the Amazon book links didn’t load on your computer, here is a written book list:
The Very First Americans – Ashrose
If You Lived with the Sioux – Mcgovern
If You Lived with the Cherokees – Roop
If You Lived with the Hopis – Kamma
If You Lived with the Iroquois – Levine
Dance of the Sacred Circle – Rodanas
The Legend of the Indian Paintbrush – dePaola
The Star People: A Lakota Story – Nelson
Buffalo Woman – Goble
Where the Buffaloes Begin – Baker
The Story of the Milky Way: A Cherokee Tale – Bruchac
The First Strawberries – Bruchac
The Woman Who Fell from the Sky : The Iroquois Story of Creation – Bierhorst
The Boy Who Lived with the Bears – Bruchac
The Rough Faced Girl – Martin
Mapping Natural America and the Native American Tribes:
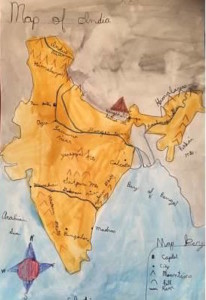
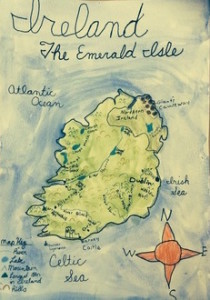
Mapmaking is such an exciting project for children. Not only is your child learning the geography of America in a much more memorable way than fill in the blank maps, but she is learning a historic art form. I find that my children truly learn and retain their geography when they create their own maps, as they are having a visual, kinesthetic, and artistic experience while learning the geography of the region.
For America, we approached our mapping project quite differently. As this is a study of Native American culture, we focused on mapping the landforms, waters, and the tribes. Much of what shaped the culture of each tribe was the environment in which it dwelled. In studying various tribes, we need to keep in mind the region they lived within, the climate, the animals, and food available. All of these things impacted each tribe’s way of life tremendously.
To Begin:
Explain to your children that before Europeans came to America, there were no borders between what is now the U.S.A., Mexico, and Canada. For this study, as we are focusing on learning about the specific region that is now the United States, we will add the borders in order to map the exact region we are focusing on.
Using your previously made cut-out, have your children outline America on their maps in pencil. Draw in the land that is now Canada and Mexico so your children know which regions of the country border land and water (Canada and Mexico will go off the paper). Using your India Ink pen, draw over your pencil outline.
Watercolor the region we are focusing on (what is now the U.S.A.) in green, what is now Mexico and Canada in brown (to show we are not focusing on them), and the waters blue.
Rivers, Lakes, Gulfs, and Oceans:
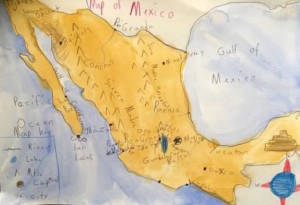
Using this map, have your children find the Pacific Ocean, the Atlantic Ocean, and the Gulf of Mexico. Have then label them on their maps.
The longest river in what is now the U.S.A is the Missouri river. The second longest is the Mississippi river. Have your children find those rivers on this map and draw them on their maps in blue colored pencil. Then have them label the rivers. Now have them find the Colorado River, the Rio Grande, the Ohio River, the Columbia River, and the Red River and add them to their maps.
Find the Great Lakes on this map. Explain to your children that these lakes are the largest collection of fresh water on earth. The five largest lakes are Lake Superior, Huron, Erie, Michigan, and Ontario. Have your children draw them on their maps and label them.
Mountain Ranges:
Use this map to view the major mountain ranges. Find the Rocky Mountains, the Appalachian Mountains, and the Sierra Nevada Mountains. Have your children draw them on their maps using upside down V’s. Then have them label the ranges.
The Native American Tribes:
Look at the map to the right with your children. Explain to your children that only a few hundred years ago, all across this land, lived many Native American tribes, and many still do. Point out the different regions such as the northeast woodlands, the southeast, the great plains, the southwest (desert), and the northwest (wooded). Explain that each region, with its unique environment, climate, animals, and vegetation, shaped the culture of the tribes. The environment impacted what people used for clothing, how they built their homes, whether they were hunters or farmers, and even their ceremonies and rituals. Now point out and name many of the tribes with your children.
Have them label as many tribes as they can on their maps. Include the Iroquois, Hopi, Sioux, Cherokee, and Navajo.
Map Details:
Add a map key and a compass rose.
After:
After completing this map, watch the videos below with your children to see some of the spectacular places we just learned about from mapping.
Wildlife of Native America:
Learning about the wildlife of the country you are studying is equally as important as learning about the geography and cultures, as hopefully we are raising a generation that will contribute to the well being of our planet, the protection of species, and the preservation of wildlife. There is no better way to contribute to that goal than to nurture in our children, from a young age, a respect and admiration for nature and wild life.
Learning about the wildlife of America is particularly important in learning about the culture of the native tribes as the animals available to each tribe impacted the culture tremendously. In regions where the buffalo lived, the tribes made tipis, or homes made of buffalo skin. They also made clothes and blankets from the skins and fur. Ceremonies and dances were centered around the buffalo. In places, such as the southwest, where buffalo did not roam, houses were made from clay and wood, and blankets were woven from plant materials. Some tribes had a fishing culture, others a hunting culture, and yet others were farmers. Every aspect of the wildlife impacted the formation of culture.
Materials- the same cut out used for tracing the first map, a large piece of thick paper, colored pencils, india ink pen, and either block crayons or watercolors
Begin by having your children outline, as they did before, the region that is now the United States in green colored pencil.
Click here to learn about the animals of this region of America.
Have your children pick as many of the animals from the above link to draw and label on their maps. Try to have them draw the animals in the regions that they live to help them understand the animals associated with tribal regions.
Use this link if your children would like to learn about the flora and plant life of the regions. Then have them add common trees or flowers to their maps.
Using a block crayon, or the side of a peeled crayon, have your children fill in the color of the land with green color, and the waters with blue, so that the entire page is filled with color.
Have them title their maps, “Wildlife of Native America.”
Introduction to the Plains Tribes:
The plains tribes refer to the many Native American tribes, such as the Sioux, Pawnee, Cheyenne, and Crow, that lived all across the great plains and do to this day. Traditionally, these tribes lived in tipis made of buffalo hide and hunted buffalo.
To introduce your children to the culture of the plains tribes, watch the following videos.
Make a Model Tipi:
Materials: pack of wood skewers, piece of cotton cloth, tacky glue, fabric markers, cardboard, hot glue, string – (optional- little fake sheepskin pieces of cloth for sleeping mats and orange tissue to make a small fire in the center of the tipi)
Note: The piece of cloth has to be precut into the shape shown in the picture below. A pattern won’t help as each family will purchase different sized skewers and some might use sticks. I just held the skewers up to the fabric and used that to mark for length.
Read the book, If You Lived with the Sioux Tribe, listed above.
Give each of your children 5 skewers and a piece of string. Explain to them that if they were building a tipi these poles would be made of solid wood cut from a tree.
Have your children tie a tight knot around the 5 skewers, about an inch below the top. Point the pointy tips down.
Then, give them each a piece of cardboard and have them spread their tipi poles apart and push the point of each pole into the cardboard. Hot glue them in place. They should now have a standing tipi frame.
Now give each of your children a piece of the precut fabric. Explain to them that this would have been made from large pieces of buffalo hide sewn together.
Look at some of the books you have read from the above list that show pictures of tipis. Using the fabric markers, allow your children to each decorate their cloth for their tipi. Explain to them that the natives used paints and dyes made from berries, plants, and other resources from nature to decorate their tipis as well as their clothes.
Using the tacky glue, have your children line the outside of each pole with glue. Then have them wrap their cloth around their tipi.
Using hot glue (for a quick dry) place a dot of glue in the middle of the opening to seal it. Then open the two flaps at the bottom and glue them open. This is the entrance.
Now open the two small flaps at the top and glue them open. This is to allow the smoke from the fire to escape and to view the stars at night.
Optional: Make a small fire in the center of the tipi by tearing off a small piece of orange tissue paper, crumpling it, and gluing it to the ground. Then place small pieces of rectangular fabric around the fire for sleeping mats (I used some fake sheepskin to make it look like animal fur). Paint the surrounding cardboard green for grass.
Medicine Bags:
The Native American medicine bag is a pouch that contains things that the owner believes will protect him or her or offer spiritual powers. Sometimes these medicine bags would be earned after a vision quest. The bag often represents the owner’s spiritual life and is held as sacred. Things that are placed inside a medicine bag include plants, herbs, animal parts, such as a shell, claw, or hair of an animal, as well as stones or crystals.
Make Your Own Medicine Bag:
Materials: faux leather or suede, needle, thread, cord, things to fill the bag (herbs, dried flowers, shells, rocks, or crystals)
Cut out a pattern similar to the picture shown below (this is not a pattern or an exact size). This includes two pieces for the pouch and one rectangular piece for the fringe that will hang below.
Cut slits at the bottom of the rectangular piece to create the fringe.
Now, lay one piece of the pouch down, then lay the fringe (upside down) on top (lining it up with the bottom of the pouch), and then lay the other piece of the pouch on top, like a sandwich, so that when you are finished sewing and turn it inside out, the fringe will hang down.
Sew the pouch and turn it inside out.
Now sew a running stitch across the top (with the cord), leaving a lot of extra cord on both ends to tie as the necklace. Knot the ends together.
Fill the bag with special treasures from nature and then pull the necklace tight so that the pouch shuts.
Enjoy!
Dreamcatchers:
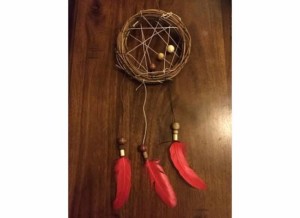
The dreamcatcher has been a part of the culture of many Native American tribes for longer than we know. The lore around it is that many dreams circulate in the air, both good and bad. Native Americans from many tribes hang dream catchers above beds, often above children’s beds. It is believed that the good dreams know how to move through the web of the dreamcatcher and gently slide down the feathers to the sleeping one, whereas the bad dreams, not knowing the way, get ensnared in the web and perish at the first rays of the light of dawn.
Make Your Own Dreamcatcher:
Materials: a small hoop (we got a small wreath about 4 inches across from Michael’s craft store for $1), string, beads, feathers, needle
Have your children thread their string on the needle and create the web in their hoops. I allowed all the kids to make any design they wished with their webs, but if your children would like to follow a pattern, use the printable to the upper right. As we used a wreath, it was easy to just push the needle through the branches, but if your children are using a small, single hoop, just have them loop the string tightly around the edge to hold it in place as they make their web. Have them string a few beads onto the web as they go.
Tie three strings to the bottom of the dream catcher and string a few beads onto the hanging strand. Then tie a feather to each loose end and insert the quill into the closest bead to hold it in place.
Loop a small string on the top of the dreamcatcher to hang it from.
Hang it above your children’s beds and wish them a night of sweet dreams!
Buffalo Hide Painting:
Buffalo hide paintings were an art form of the plains tribes. Buffalo hide was used as the canvas, and various plants, berries, rocks, and minerals were used to make natural paints. The artists used traditional symbols to tell a story or record important tribal events.
Make Your Own Buffalo Hide Painting:
Materials: Paper bag, black marker, colored markers or paints, printout of traditional symbols to the right
Begin by reading the book from the above list, Legend of the Indian Paintbrush.
Then tear out a large rectangular piece from a brown shopping bag. You want to tear it rather than cut it to have the natural edge. Have one for yourself, and give one to each of your children.
Crumple the paper and then spread it out to give it a worn and natural hide look.
Make up a short and simple story using the symbols to the right. As you tell your children the story, draw the symbols on your buffalo hide to illustrate it (in black marker). Then have your children either copy that story (and drawing) or make up their own.
Use markers or paints to add color.
Have each of your children stand up and, while holding their buffalo hide paintings, either re-tell the original story, or the story they made up.
Introduction to the Southwestern Tribes:
The tribes of the southwest have a different culture than the plains tribes. Traditionally, their homes were not made of buffalo skin, as there were no buffalo living in their region. The climate was dry desert, therefore the homes were often made of adobe or other types of mud. Historically, some of the southwestern tribes were made up of farmers, others of hunters and gatherers. Some tribes were originally made up of hunter/ gatherers and later learned farming from nearby tribes. Traditional clothes are made from woven fibers rather than skins.
Make a Hopi Home:
Traditional Hopi homes were made of adobe bricks with wooden poles lying across the roof to hold up the next floor. The bottom story was the storeroom and had no ground level entry. Instead, there was a ladder to the roof where there was an entrance. In case of attacks from other tribes, the ladder would quickly be pulled up and the inhabitants would be safe. Additional floors on the upper stories had front entrances.
Make a Hopi Home:
Materials: piece of cardboard, air dry terra cotta clay, wood skewers
Have your children make many small bricks from the clay.
Have them arrange the clay bricks in a square or rectangle shape (only laying bricks along the perimeter).
Then have them slowly build the walls up.
Have them lay the skewers across the top of the walls at somewhat close intervals. If the skewers are too long, just break them off to the correct length.
Have them flatten pieces of clay and lay them across the poles. Remind them to leave a hole for the entrance on the roof.
This is the bottom floor, which is the storeroom. We only built the bottom floor in order to understand how the homes were built, using the bricks of clay. You are welcome to build the upper levels, but if you do, place the skewers very close together so they might be able to hold the weight. I assume this must have also been a concern for the Hopi.
Enjoy!
Navajo Weaving:
The Navajo tribe is famous for its strikingly beautiful woven blankets and wall hangings.
Make Your Own Navajo Woven Wall Hanging:
Materials: small rectangular piece of cardboard, string, a few colors of yarn, 2 sticks, feather, thick, large sized needle, scissors
To make your weaving loom: cut one inch long cuts along the top and bottom of the cardboard as it is held vertically. Space the cuts evenly (as shown in the picture to the right of the materials). Then string your loom by looping the string through the slits. Leave a long piece at the beginning and the end and tie to hold it in place.
To Begin Weaving:
Have your children pick their first color. Tie the yarn onto the outer string of the loom. Thread through the needle. Begin weaving by going over – under – over – under till the end. Loop back. When the color is finished, have your children pick a new color. Tie the end on to the remains of the last color, thread the needle, and begin to weave.
Continue like this until the weaving reaches the top.
To Finish:
Turn the weaving loom over and cut along the middle of the strings on the back of the loom. Take the two first strings off the loom and tie them together. Then take the next two off and tie them together. Continue until the entire weaving is off the loom, top and bottom.
Lie the weaving on the table and lie a stick along the top. Use the remaining string to tie the stick to the top of the weaving. Take another stick and do the same to the bottom. Now take a piece of colored yarn and tie a piece on top for hanging.
If your child has a feather, have them weave the feather into the weaving.
Hang your Navajo weaving on your wall to enjoy!
Cooking a Traditional Native American Meal: Three Sisters Iroquois Soup and Native American Fry Bread
Cooking day, as I have mentioned before, is by far, my children’s favorite country study activity. If you haven’t cooked with your kids before, you might be tempted to pass over this activity, but please don’t. It is such a wonderful experience, and your children will have so much fun! My children always feel so proud of the meals they prepare. As kids from our community joined us for our Native America study, I had seven children cooking in the kitchen and they did such a wonderful job! This meal was absolutely delicious. Each child had three bowlfuls!
The Iroquois tribe lives in the northeastern woodlands. Historically, they were horticulturists, farmers, hunter-gatherers, and fishermen. Most of their food came from farming and their main crops were corn, beans, and squash. Those three vegetables were called the “three sisters.”
Click here for the recipe we used for our Three Sisters soup.
Click here for the recipe for the Native American Fry bread. (We actually used gluten free flour and it came out great!)
Enjoy!
Featured Country Studies
Featured Blog Posts


Simple Things That Help Me Stay Balance While Homeschooling
What This Site Offers and Will Offer:
HOME COUNTRY STUDIES:
On our Country Study Pages you will find month long, complete geography and culture curriculums for selected countries. For each individual country study, you will find a booklist, an introduction to the country and the beauty of the region, mapmaking projects, projects based on traditional folktales, projects based on the traditional clothing of the region, recipes for cooking traditional meals, art projects, links to become familiar with the traditional music and dance of that country, and more.
NATURE STUDY:
By clicking on our “Explore Nature” tab you will find an ever growing wealth of resources to help you make nature study a wonderful and intrinsic part of your homeschool. From wildlife sketching video tutorials from John Muir Laws, to activities to get your children out and excited about nature, to wonderful products to help you educate your children about natural history. This section of our site will be replete with ideas to help you educate your children about nature, as well as give them the opportunity to create a life long bond with nature.
BLOG:
Please keep up with our blog! Topics will range from all things homeschooling, to topics of interest to mothers and family life, as well as much more!
COMING SOON!!
EXPLORE LITERATURE
Very soon I will have an “Explore Literature” tab on the menu. This section of the site will include booklists for various ages, as well as wonderful literature for mothers. Literature and reading are cornerstones of our homeschooling, as well as my life personally, and I hope to share with you the titles that have brought wonder, joy, empathy, ethics, and adventure into our lives.
COMING SOON!!
TRAVEL ADVENTURE PAGES
Next year I will begin creating travel adventure pages. These pages will offer full educational travel itineraries for various countries to help you create the educational trip of a lifetime. In each region, accommodations, historic sites, museums, historic re-enactments, cultural activities, and nature sites will be highlighted. There is nothing that compares to real life learning, and traveling is an amazing way to experience that.